It’s important to note that not all Hebrew keyboard layouts support all the diacritical marks available in the Unicode Hebrew code range. This is the case with the the “SI-1452” layout, the default Hebrew keyboard layout that comes with many systems (including Windows and GNU/Linux/X11). The instructions presented below refer to the layout designed by John Hudson known as the “Biblical Hebrew (Tiro) Keyboard.”
Install Unicode Hebrew Fonts
Before you setup your keyboard layout for Hebrew, make certain to install a font that supports the full Biblical Hebrew Unicode vowel set (Unicode 4.1 or above). Ezra SIL SR, Cardo, and Taamey Frank CLM are excellent fonts in the Open Siddur font pack to install. We’ve provided a special font pack containing perhaps the largest collection of open source licensed Unicode Hebrew fonts that exist. You can download that here. If you’d like to install all the fonts in the font pack at once, follow these instructions:
- To search and find all of the TTF files in the unzipped directory of fonts, use CTRL-F
type *.ttf (asterisk dot ttf) as your search keyword. - The search will list all of the fonts in their separate directories.
To select all of them at once use CTRL-A. (Alternately you can click edit on the windows toolbar and select, “select all”.) - Then right-click on any of the highlighted fonts and select “install font”. (Make sure to right-click rather than left-click, otherwise you won’t see the install font option and you’ll have to select them all again using CTRL-A.)
Install a Hebrew Keyboard Layout
Within the font pack are keyboard layouts suitable for Microsoft Windows and Apple OS X. Linux users can add this keyboard simply by going to their Keyboard settings and following the instructions at the bottom of this post.
Installing the keyboard layout in Windows is as simple as running the install file. On OS X, keyboard layout and install. (check here for support.
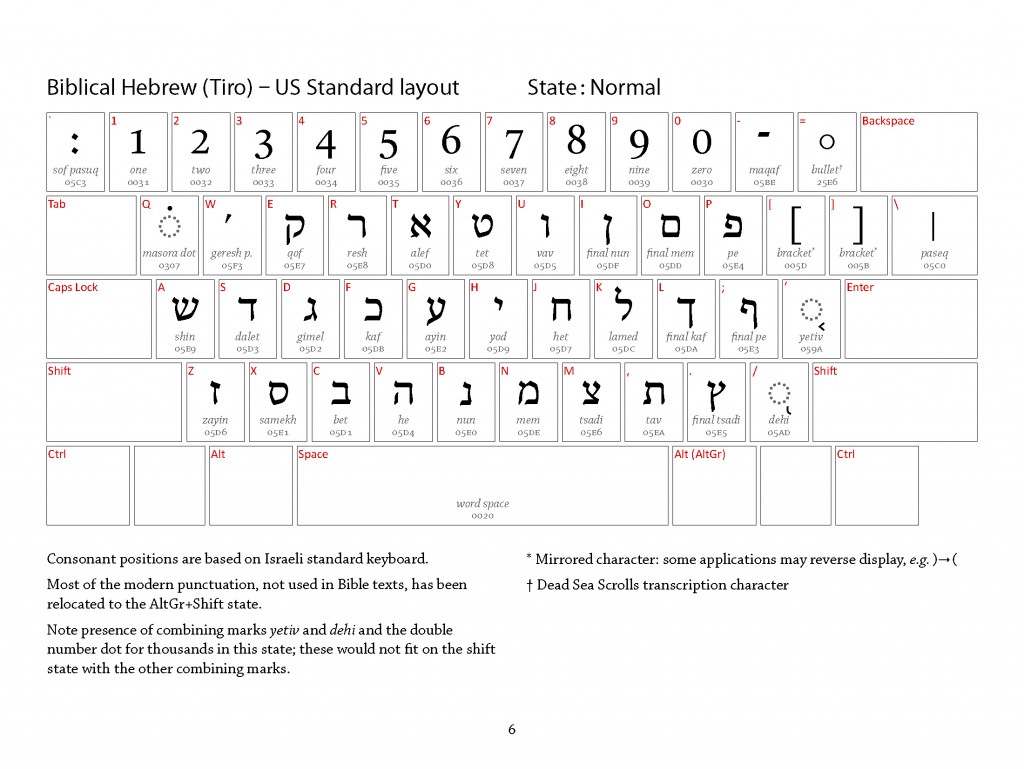
After the install routine completes, open up a capable text editor such as LibreOffice and try out your Hebrew keyboard. (pro-tip: In Windows, you can toggle between your default language and Hebrew by pressing ALT-SHIFT.) To learn the Hebrew keyboard layout, take note of the images at the bottom of this page.
Typing Tips
Once you start typing, you should know the following rule: when typing a letter containing a dagesh and a vowel or some other diacritic, first type the letter, then the dagesh, then the additional diacritical mark or marks.
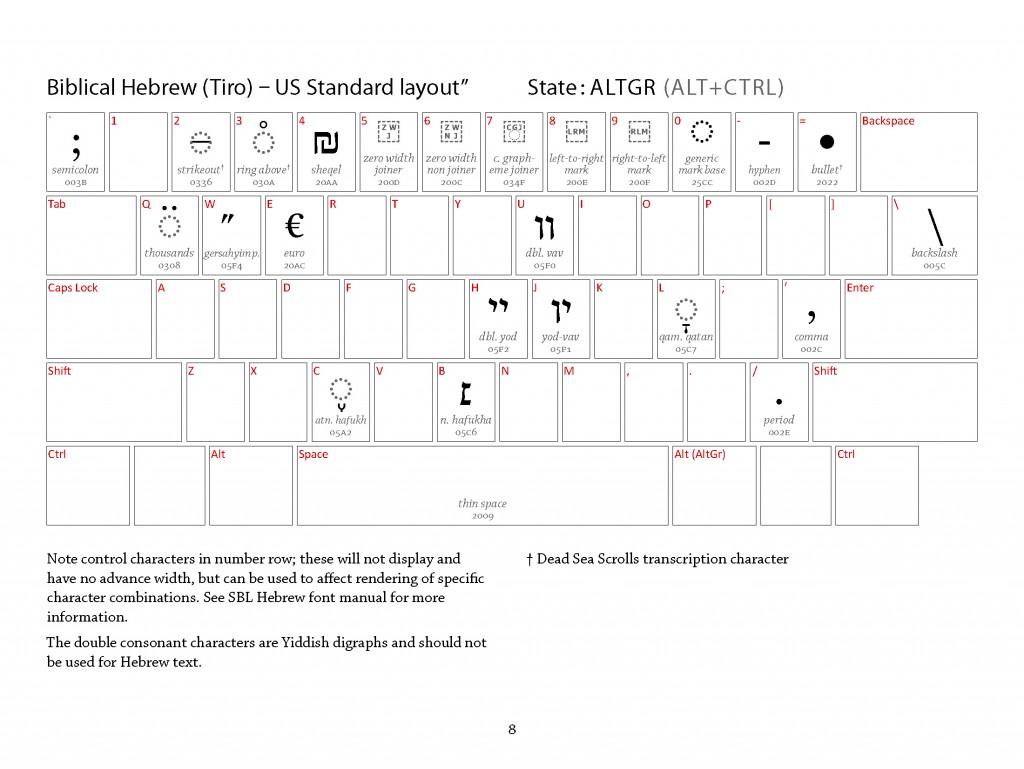
when you notice you’re punctuation misaligned and misplaced, you should know why that’s happening and how to fix it. Text editors need to be told to display text as RTL (right-to-left) text. With your Hebrew keyboard layout selected, you can always place an invisible mark at the end of your paragraph identifying your text as RTL. To do so, use the “End” key to move to the end of the line, and press ALT+CTRL 9. This sets an invisble RTL code at the end of the line, so periods and other punctuation should now display correctly.
We recommend LibreOffice as a cross-platform and open source Unicode text editor. Follow our setup guide for LibreOffice.
Hebrew Keyboard Layout Levels
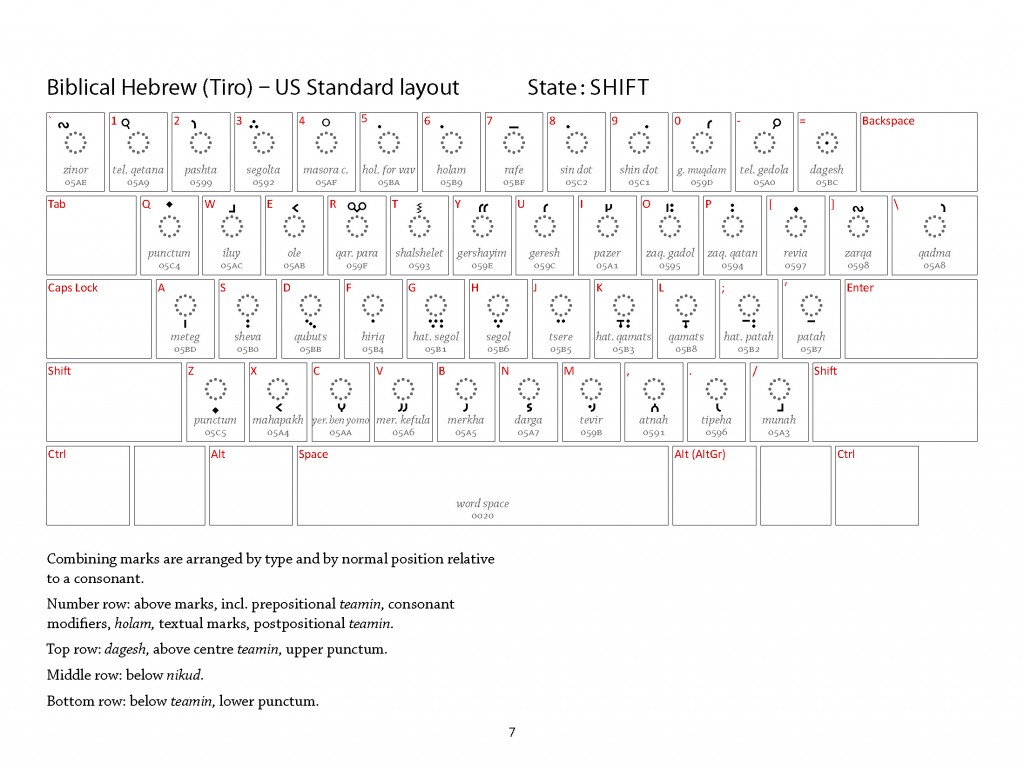
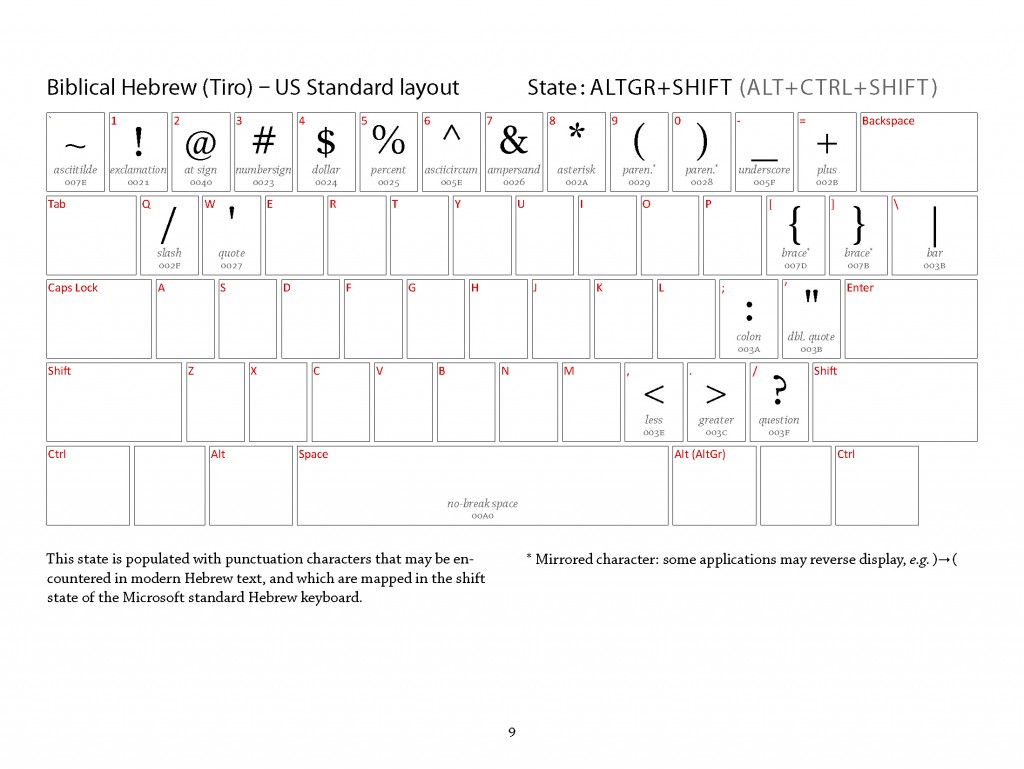
There are four levels to the Hebrew keyboard that you can access. On-screen keyboard programs are useful to see the different characters available at each level of your keyboard. You can see the characters available to type if you use an on-screen keyboard as you press SHIFT or ALT. On-screen keyboards come shipped with your Operating System:
The images below from John Hudson’s Biblical Hebrew (Tiro) Keyboard Manual provide a reference to which glyphs correspond to which keys on the keyboard. The first level is the default level with all of the letter forms and numbers. The second level contains vowels and cantillation marks and is accessed using the SHIFT key. The third level contains additional punctuation and diacritics and is accessed using the ALT+CTRL keys. The fourth level contains punctuation and is accessed using SHIFT+ALT+CTRL keys.
Here is the keyboard mapping for the four levels of the keyboard:

Image: NORMAL (Level 1) Biblical Hebrew (Tiro) Keyboard Layout from the Biblical Hebrew (Tiro) Keyboard Manual v.1.5 by John Hudson (Copyright 2007)

Image: SHIFT (Level 2) Biblical Hebrew (Tiro) Keyboard Layout from the Biblical Hebrew (Tiro) Keyboard Manual v.1.5 by John Hudson (Copyright 2007)

Image: ALT-CTRL (Level 3) Biblical Hebrew (Tiro) Keyboard Layout from the Biblical Hebrew (Tiro) Keyboard Manual v.1.5 by John Hudson (Copyright 2007)

Image: ALT-CTRL SHIFT (Level 4) Biblical Hebrew (Tiro) Keyboard Layout from the Biblical Hebrew (Tiro) Keyboard Manual v.1.5 by John Hudson (Copyright 2007)
Instructions for Installing a Hebrew Keyboard Layout on GNU/Linux
KDE
The default X11 distribution comes with a Biblical Hebrew keyboard layout. KDE (versions 3 and 4) have a keyboard switching applet. To activate the layout:
- from the K Menu, find “System Systems”
- select “Regional and Language”
- select “Keyboard layout.” Make sure that “Enable keyboard layouts” is selected.
- From the “Available layouts” list, select “Israel.” Click on the right-facing arrow button to move the layout to the “Active layouts.”
- Click on “Israel” in the “Active layouts”
- From the “Layout variant” box, select “Biblical Hebrew (Tiro)”
- Go to the “Advanced” tab. Under “key to choose third level”, select a key. The win key (on 104 key keyboards) or the right alt key are good choices. You may also choose a key combination that will switch keyboard layouts (Alt-Shift is a common choice).
Press “Apply” - To switch layouts, either use your chosen key combination or click on the flag in the system tray.
GNOME
- Run the “Gnome Control Center”
- Under the “Hardware” category, select “Keyboard”
- Select the “Layouts” tab. Press the “Add” button
- Under “Country”, select “Israel”
- Under “Variants”, select “Israel Biblical Hebrew (Tiro).” Press the “Add” button.
- Click on the newly added layout in the list box.
Press “Layout options” - Under “Key to choose third level”, select a key of your choice (Right alt or Menu are good choices)
- Press “Close.” Press “Close” on the Keyboard Preferences window. Close the Gnome Control Center

